"Travellin' through Hyperspace ain't like dustin' crops, boy!:" Creating Lightspeed and Hyperspace FX
Part 3: Creating Lightspeed starlines
by Jedi Knight Toren Depor
1) Right click (Command-Click on the Mac) on the Objects folder and select New>Model. Highlight the new model in the Project Workspace and title it "starlines." Begin by creating a vertical marker by clicking on the ruler that runs across the top of the screen. Double click on the marker to enter the coordinates of the marker. Enter -100 for this one, then create a horizontal marker (the same way as creating the vertical markers) at 80cm.
2) Now switch to a side view (4 or 6 on the keypad) and draw a 2-point spline (A) with one CP at 0cm on the z-axis and the other at around 10cm on the z-axis. Switch back to the front view (2 on the keypad) and position your new spline somewhere in the middle of the zone we blocked out with markers in Step 1.

Figure 3-2 | 
Figure 3-3 |
3) At this point we are going to start creating our starfield. Copy (CTRL+C) and paste (CTRL+V) the spline we drew allot. Copy groups of it and rotate it (R), scale it (S) (along the X and Y Axis' only though!) until you get something like Figure 3-4. You can paste stars/splines outside of the markers, just avoid the area down near the X and Y Zero Coordinates. Make sure that your front CP's are all at 10cm along the Z Axis and your back CP's are all at 0cm along the Z Axis.
Figure 3-4
4) Select All (CTRL+A) then copy (CTRL+C) and paste (CTRL+V). Go to the Pivot tab on the Properties Panel and enter 0 into the X field. Right click (Command-Click on the Mac) on the newly pasted splines and go to Flip>X-Axis. Now Select All (CTRL+A) again then copy (CTRL+C) and paste (CTRL+V). Go to the Pivot tab on the Properties Panel and enter 0 into the Y field. Right click (Command-Click on the Mac) on the newly pasted splines and go to Flip>Y-Axis. You should now see something like Figure 3-5.
Figure 3-5
5) Before proceeding I would recommend randomizing the starfield a bit so it doesn't look so mirrored. You can do this by selecting portions of the starfield and rotating, flipping, translating, or scaling them (only along the X and Y Axis though.) As always make sure to keep your front CP's at 10cm and your back CP's at 0cm.
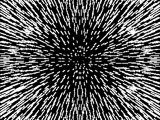
6) Switch to a side view (4 or 6 on the keypad) and select your front CP's. In the Project Workspace, title the group "front." Invert the selection (.) and name that group "back." Select All (CTRL+A), then name that group "starlines." Go to the Options tab of the Properties Panel for the "starlines" group and check "Render group as lines" on. Now go to the Lines tab of the Properties Panel. If you want the kinds of starlines seen in Episode IV: A New Hope and Episode V: The Empire Strikes Back, set the color to White, width to .2 and check the Glowing box on. If you want the bluish lines seen in Episode VI: Return of the Jedi, set the color to Red: 181, Green: 181, Blue: 255.
Figure 3-6
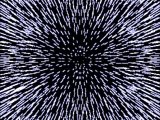
7) In the Project Workspace, select the front group and on the Group tab of the Properties Panel, enter -10 into the Z Offset field (lower-left field). Now go ahead and close the "starlines" model. In the Project Workspace right click (Command-Click on the Mac) and go to New>Pose. Switch to Muscle Mode (F7) and on the frame bar enter frame 50 into the field. Select the front group in the Project Workspace and enter 290 into the Z Offset field. Select the back group and move them back once with the arrow keys and forward again. This will lock their position in space for this frame. Advance to frame 51 and move the "front" group froward and back to lock their position.
Figure 3-7
8) Advance to frame 100 and select the front group. Move them forward and back again to lock their position in space for that frame. Now select the back group and enter 290 into the Z Offset field. Now go to frame 1. Select the back group and go to the Pivot tab on the Properties Panel. You will notice that the Z pivot point is at -0.19cm. This is because the Default Interpolation in A:M is Spline, which is best for most things but hear we want Linear Interpolation. Unfortunately, it would take a ridiculously long time to change each and every one of the CP's Interpolation type. So what we are going to do is correct the position of the back group at regular intervals. The way you do this is by copying the Z Pivot value and then pasting the inverse into the Z Offset value. So for example for frame 1 you would enter -0.19. If the value was 1.5, you would enter -1.5. You need to do this on frames 1 and 49. When you are done close title the pose "punchit."
9) Right click (Command-Click on the Mac) on the Choreographies folder in the Project Workspace and select New Choreography. Rename this choreography "starlines." A new light will be created, delete it from the Objects folder. Expand the "starlines" choreography and select the camera. Go to the Rotate tab of the Properties Panel and enter 0 into the Y Rotate field. Go to the Translate tab and enter 0 into the Y field and 300 into the Z field.
Figure 3-8
10) Select the "starlines" choreography in the Project Workspace. Enter .25 into the Glow Radius field and 100 into the Glow Intensity field. Drag the "starlines" model onto the starlines choreography in the Project Workspace. Switch to the Camera view (1 on the keypad) and select the "starlines" model. Open the Pose Slider window (ALT+3) and click on the numeric entry field for "punchit" and enter 0. Now expand the "Shortcut" to starlines in the Project Workspace until you see a Pose Channels folder. Expand that folder until you see a Percentage channel in the Project Workspace. Open that channel.
11) Add a new keyframe (A) at frame 40 (1:10) with a value of 10. In the Gamma fields enter 4.63 and in the Magnitude fields enter 81.98. Create another keyframe at frame 57 (1:27) with a value of 27.89, another keyframe at 64 (2:04) with a value of 45.35, again at 65 (2:05) with a value of 50.93, and finally one last keyframe at 4:05 with a value of 0.
Figure 3-9
12) Close the Pose Slider Percentage channel and open the "starlines" choreography back up, switch to the camera view (1 on the keypad) and render!
Part 1: Observations and References of Lightspeed/Hyperspace Phenomenon
An analysis of the different effects associated with hyperspace, and the difference in their appearance throughout the films.
Part 2: Exterior Hyperspace Animations
How to properly animate a spaceship as it jumps into and drops out of hyperspace from an external viewpoint.
Part 4: Creating Hyperspace Tunnels
Hyperspace Tunnel #1: Star Wars: Episode IV: A New Hope
Creating the hyperspace tunnel effect as seen just prior to the Millennium Falcon dropping out of Hyperspace in the Alderaan system in ANH.
Hyperspace Tunnel #2: Star Wars: Episode VI: Return of the Jedi
Creating the hyperspace tunnel effect as seen from the cockpit of the Millennium Falcon as it drops out of Hyperspace in the Endor system in ROTJ.
Hyperspace Tunnel #3: Star Wars: Episode II: Attack of the Clones
Creating the hyperspace tunnel effect as seen in Select #20.
DOWNLOADS
Completed Project File .99MB
Contains all of the materials, models, actions, and choreographies used in this tutorial in a ZIP Archive.
Completed Project File .99MB
Contains all of the materials, models, actions, and choreographies used in this tutorial in a SIT Archive.
Tutorial: Off-Line Version 6.76MB
All of these tutorials downloadable as a ZIP Archive.
Tutorial: Off-Line Version 6.81MB
All of these tutorials downloadable as a SIT Archive.
CREDITS:
Tutorial by Jedi Knight Toren Depor(a.k.a. Filmmaker Matt Pfingsten)
Special Thanks to
Zoo of Sci-Fi3D for donating the Corellian Corvette 3DS model
The Animaster Mailing List for providing such great feedback and support on all of my tutorials.
TheForce.Net for hosting this tutorial
Hash Inc. for making such powerful 3D software
George Lucas for creating Star Wars

![[TFN FanFilms Now On YouTube.com]](/fanfilms/images/fanfilm-youtube.jpg)