1)For this part of the tutorial you will need to download the freeware plugin CellTurb from Andy Whittock's ToonNation texture plugins.
2) Right click (Command-Click on the Mac) on the Materials folder and select New Material. Highlight the new material in the Project Workspace and title it "hyperspaceANH." Expand the material and the right click (Command-Click on the Mac) on the Attribute and go to Change Type To>Combiner>Turbulence>CellTurb. Go to the Properties Panel for CellTurb. On the General tab, enter 1000 into the X and Y Scale fields (top two scale fields) and 6000 into the Z scale field. On the first CellTurb tab, change the Cell Type to Ridged and change the number of octaves to 2.
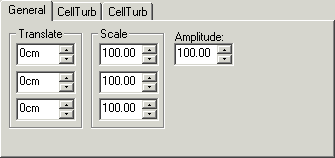
Figure 4-1-1
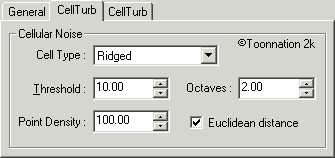
Figure 4-1-2
3) Expand the CellTurb attribute node and you should see two Attributes. Set the first attribute's color to Black and it's ambiance to 0. Leave all other fields blank. Go to the second attribute and set it's color to Red: 119, Green: 147, Blue: 255. Set it's falloff to 60 and it's ambiance to 0. Leave all other fields blank.
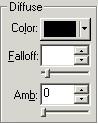
Figure 4-1-3 | 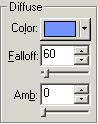
Figure 4-1-4 |
4) Close the "hyperspaceANH" material and right click (Command-Click on the Mac) on the Objects folder and select New>Model. Select the model in the Project Workspace and rename it (F2) to "hyperspaceANH." Switch to the top view (5 on the keypad) and draw a 4-point spline (SHIFT+A) that resembles Figure 4-1-5. The first CP should be 15cm along the X axis and 0ccm along the Z axis. The second CP should be at 10cm on the X-Axis and -5 along the Z axis. The third should be at 10cm on the X axis and -215cm on the Z axis. The fourth should simply round the shape at the end. You will need to adjust the gamma (Bias handles with Shift held down) of the individual CP's to get the shapes as seen below.
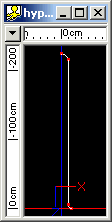
Figure 4-1-5 | 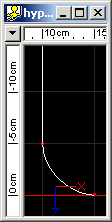
Figure 4-1-6 |
5) Select All (CTRL+A) and go to the Pivot tab on the Properties Panel. Set all Pivot points to 0 then go to the Group tab and enter -90 into the X Rotate field. Select one of the CP's and lathe (L) it. Select the top cross section and scale it to 1 on all 3 axis's. Select All (CTRL+A) and go to the Pivot tab on the Properties Panel. Set all Pivot points to 0 then go to the Group tab and enter 90 into the X Rotate field. Your model should look like Figure 4-1-7.
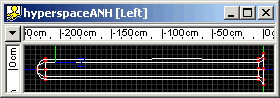
Figure 4-1-7
6) In the Project Workspace, drag and drop the "hyperspaceANH" material onto the "hyperspaceANH" model. Now right click (Command-Click on the Mac) on the "hyperspaceANH" model and select New>Pose. Name this pose "hyperspaceANH." Enter Muscle Mode (F7) and select the back two cross-sections as in Figure 4-1-8. On the Group tab of the Properties Panel, enter 25 into all 3 scale fields. You should have something looks like Figure 4-1-9. Close the pose.
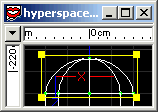
Figure 4-1-8 | 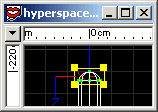
Figure 4-1-9 |
7) Right click (Command-Click on the Mac) on the Choreographies folder and select New Choreography. Name this choreography "hyperspaceANH." Select the "hyperspaceANH" choreography in the Project Workspace and enter 75 into the Glow Intensity field. Select the camera and go to the Translate tab on the Properties Panel and enter 0 into the X and Y fields (top two fields) and enter 8.76 into the Z scale field (bottom field). Go to the Rotate tab and enter 0 into the X, Y, and Roll fields, and -100 into the Z field. Drag and drop the "hyperspaceANH" model onto the choreography in the Project Workspace. The choreography should look like Figure 4-1-10.
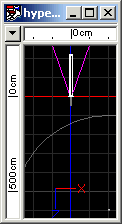
Figure 4-1-10
8) Now let's go ahead and position our light. In the Project Workspace under the Objects folder, select "Light2" and change it's color to White. Also uncheck "Specular" and "Diffuse." On the Bulb tab, change the Width to 2cm, the Distance to Fall-Off to 25cm, and the Fall-Off Softness to 0. Go back to the "Shortcut to Light2" in the "hyperspaceANH" choreography and select it. On the Translate tab of the Properties Panel enter 0 into the X and Y fields and -216.34 into the Z field. Drag another 3 instances of the "Light2" into the choreography. There X and Y position should be the same as the fist instance but the Z position should be set to -216.34 on the first one, -164.85 on the second, and -62.51 on the third.
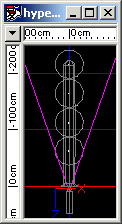
Figure 4-1-11
9) Now select the "Shortcut to hyperspaceANH" in the "hyperspaceANH" choreography and open the pose slider window (ALT+3). Make sure that you are on frame 0 and enter 100 into the percentage field for "hyperspaceANH" pose slider.
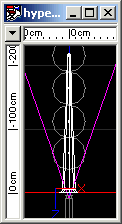
Figure 4-1-12
10) Right click (Command-Click on the Mac) on the Actions folder in the Project Workspace and select New Action. Select "hyperspaceANH" as the model. Rename the action "hyperspaceANH." Scroll up to the "hyperspaceANH" model in the Objects folder and drag and drop the "Shortcut to hyperspaceANH" material shortcut onto the action. On the Channels folder of the Properties Panel, check "Z-Translate" on. Expand the "hyperspaceANH" action and open the "Z-Translate" channel. Create a keyframe at frame 0 with a value of 0 and another keyframe at frame 90 (3:00) with a value of 400.
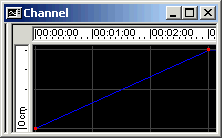
Figure 4-1-13
11) Drag and drop the "hyperspaceANH" action onto the "Shortcut to hyperspaceANH" model in the "hyperspaceANH" choreography. Switch to the camera view (1 on the keypad) and Render to file. NOTE: If you wanted a longer animation you would have made the action longer. The texture needs to translate along the Z-axis at 400cm per every 3 seconds.
Example:

hyperANH.mov 465 KB
Hyperspace Tunnel #2: Star Wars: Episode VI: Return of the Jedi
Creating the hyperspace tunnel effect as seen from the cockpit of the Millennium Falcon as it drops out of Hyperspace in the Endor system in ROTJ.
Hyperspace Tunnel #3: Star Wars: Episode II: Attack of the Clones
Creating the hyperspace tunnel effect as seen in Select #20.
Part 1: Observations and References of Lightspeed/Hyperspace Phenomenon
An analysis of the different effects associated with hyperspace, and the difference in their appearance throughout the films.
Part 2: Exterior Hyperspace Animations
How to properly animate a spaceship as it jumps into and drops out of hyperspace from an external viewpoint.
DOWNLOADS
Completed Project File .99MB
Contains all of the materials, models, actions, and choreographies used in this tutorial in a ZIP Archive.
Completed Project File .99MB
Contains all of the materials, models, actions, and choreographies used in this tutorial in a SIT Archive.
Tutorial: Off-Line Version 6.76MB
All of these tutorials downloadable as a ZIP Archive.
Tutorial: Off-Line Version 6.81MB
All of these tutorials downloadable as a SIT Archive.
CREDITS:
Tutorial by Jedi Knight Toren Depor(a.k.a. Filmmaker Matt Pfingsten)
Special Thanks to
Zoo of Sci-Fi3D for donating the Corellian Corvette 3DS model
The Animaster Mailing List for providing such great feedback and support on all of my tutorials.
TheForce.Net for hosting this tutorial
Hash Inc. for making such powerful 3D software
George Lucas for creating Star Wars

![[TFN FanFilms Now On YouTube.com]](/fanfilms/images/fanfilm-youtube.jpg)