1)For this part of the tutorial you will need to download the freeware plugin CellTurb from Andy Whittock's ToonNation texture plugins.
2) Right click (Command-Click on the Mac) on the Materials folder and select New Material. Highlight the new material in the Project Workspace and title it "hyperspaceAOTC." Expand the material and the right click (Command-Click on the Mac) on the Attribute and go to Change Type To>Combiner>Turbulence>Sine. Go to the Properties Panel for Sine. On the General tab, enter 1000 into all three of the Scale fields and 200 into the Amplitude field. On the Sine tab, change the number of octaves to 4.
3) Expand the Sine attribute node and you should see two Attributes. Change the first attribute to a Sine turbulence combiner. Set the second attribute's color to Red: 194, Green: 167, Blue: 209 and it's ambiance to 100. Go to the Transparency tab and set the transparency to 0. Go to the Reflectivity tab and check "Overrode Base Attribute" and "Glowing" on. leave all other fields blank. Go to the General tab of the Properties Panel for "Sine2" and set all 3 scale fields to 1000 and the Amplitude to 300. On the Sine tab, change the number of octaves to 5.
4) Expand the Sine2 attribute node and you should see two Attributes. Set the first attribute's color to Red: 194, Green: 167, Blue: 209 and it's ambiance to 100. Go to the Transparency tab and set the transparency to 100. Go to the Reflectivity tab and check "Overrode Base Attribute" and "Glowing" on. leave all other fields blank. Set the second attribute's color to Red: 194, Green: 167, Blue: 209 and it's ambiance to 100. Go to the Transparency tab and set the transparency to 0. Go to the Reflectivity tab and check "Overrode Base Attribute" and "Glowing" on. leave all other fields blank.
5) Close the "hyperspaceAOTC" material and right click (Command-Click on the Mac) on the "hyperspaceROTJ" model from the previous lesson and select Save As... and type "hyperspaceAOTC." Select the "hyperspaceAOTC" model in the Project Workspace, then go to the File tab on the Properties Panel and select "Embed in Project File" and rename it back to "hyperspaceROTJ."
6) Right click (Command-Click on the Mac) on the Objects folder and select Import>Model and import the "hyperspaceAOTC" model. Set it to "Embed in Project File." Expand the model and delete the "Shortcut to hyperspaceROTJ" material shortcut and then drag and drop the "hyperspaceAOTC" material onto the "hyperspaceAOTC" model. Delete "Bone1."
7) In the Project Workspace, right click (Command-Click on the Mac) on the "hyperspaceROTJ" choreography and select Save As... and save it as "hyperspaceAOTC." Set "hyperspaceAOTC" to "Embed in Project File" and rename it back to "hyperspaceROTJ." Right click (Command-Click on the Mac) on the Choreographies folder and select Import Choreography and select "hyperspaceAOTC" and embed it in the project file. Expand the "hyperspaceAOTC" choreography and select "Shortcut to hyperspaceROTJ" and on the General tab of the Properties Panel, use the "Shortcut To:" drop-down menu to select the "hyperspaceAOTC" model.
8) Right click (Command-Click on the Mac) on the Actions folder in the Project Workspace and select New Action. Select "hyperspaceAOTC" as the model. Rename the action "hyperspaceAOTC." Scroll up to the "hyperspaceAOTC" model in the Objects folder and drag and drop the "Shortcut to hyperspaceAOTC" material shortcut onto the action. On the Channels folder of the Properties Panel, check "Z-Translate" on. Expand the "hyperspaceAOTC" action and open the "Z-Translate" channel. Create a keyframe at frame 0 with a value of 0 and another keyframe at frame 90 (3:00) with a value of 400.
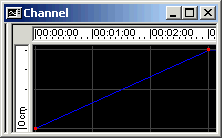
Figure 4-3-1
9) Delete the "Shortcut to hyperspaceROTJ" action from the "Shortcut to hyperspaceAOTC" model in the "hyperspaceAOTC" choreography. Drag and drop the "hyperspaceAOTC" action onto the "Shortcut to hyperspaceAOTC" model in the "hyperspaceAOTC" choreography.
10) Right click (Command-Click on the Mac) on the Materials folder and select New Material. Highlight the new material in the Project Workspace and title it "linesAOTC." Expand the material and the right click (Command-Click on the Mac) on the Attribute and go to Change Type To>Combiner>Turbulence>Sine. Go to the Properties Panel for Sine. On the General tab, enter 1000 into the X and Y Scale fields (top two fields) and 950 into the Z scale field. Enter 200 into the Amplitude field. On the Sine tab, change the number of octaves to 4.
11) Expand the Sine attribute node and you should see two Attributes. Change the first attribute to a Sine turbulence combiner. On the General tab of the Properties Panel for "Sine2" and set all three scale fields to 1000, the amplitude to 300, and then on on the Sine tab, change the number of Octaves to 4. Change the second attribute to a CellTurb combiner. Set the X and Y scale for "CellTurb" to 5.50 and the Z scale to 10000. Set the amplitude to 1000 and leave everything else at default settings.
12) Expand the "Sine2" attribute node and you should see two Attributes. Set both attribute's colors to Red: 238, Green: 230, Blue: 242 and their ambiences to 100. Go to the Transparency tab and set the transparency to 100. Go to the Reflectivity tab and check "Overrode Base Attribute" and "Glowing" on. leave all other fields blank.
13) Expand the "CellTurb" attribute node and you should see two Attributes. Set the first attribute's color to Red: 238, Green: 230, Blue: 242 and it's ambience to 100. Go to the Transparency tab and set the transparency to 100. Go to the Reflectivity tab and check "Overrode Base Attribute" and "Glowing" on. leave all other fields blank. On the second attribute, use all the same settings as the first attribute, except the transparency should be set to 0.
14) Close the "linesAOTC" material and right click (Command-Click on the Mac) on the "hyperspaceAOTC" model and select Save As... and type "linesAOTC." Select the "linesAOTC" model in the Project Workspace, then go to the File tab on the Properties Panel and select "Embed in Project File" and rename it back to "hyperspaceAOTC."
15) Right click (Command-Click on the Mac) on the Objects folder and select Import>Model and import the "linesAOTC" model. Set it to "Embed in Project File." Expand the model and delete the "Shortcut to hyperspaceAOTC" material shortcut and then drag and drop the "linesAOTC" material onto the "hyperspaceAOTC" model.
16) Right click (Command-Click on the Mac) on the Actions folder in the Project Workspace and select New Action. Select "linesAOTC" as the model. Rename the action "linesAOTC." Scroll up to the "linesAOTC" model in the Objects folder and drag and drop the "Shortcut to linesAOTC" material shortcut onto the action. On the Channels folder of the Properties Panel, check "Z-Translate" on. Expand the "linesAOTC" action and open the "Z-Translate" channel. Create a keyframe at frame 0 with a value of 0 and another keyframe at frame 90 (3:00) with a value of 400.
Figure 4-3-2
17) Drag and drop the "linesAOTC" model onto the "hyperspaceAOTC choreography. On the Scale tab of the Properties Panel for "Shortcut to linesAOTC" set the X and Y scale values to 110. Drag and drop the "linesAOTC" action onto the "Shortcut to linesAOTC" model in the "hyperspaceAOTC" choreography. Select the "Shortcut to linesAOTC" model and adjust the "hyperspaceANH" pose slider to 100%.
19) Switch to the camera view (1 on the keypad) and Render to file. NOTE: If you wanted a longer animation you would have made the action longer. The texture needs to translate along the Z-axis at 400cm per every 3 seconds.
Example:

hyperAOC.mov 466 KB
BONUS: Animated Veresion of Episode II Select #20!
I went ahead and created a short animation based on the image in Select #20. The Republic Cruiser Model was created by Sci-Fi 3D
1.06MB, ON2 Codec (ON2 Codec will download automatically if QuickTime Update is Enabled)

![[TFN FanFilms Now On YouTube.com]](/fanfilms/images/fanfilm-youtube.jpg)