"Travellin' through Hyperspace ain't like dustin' crops, boy!:" Creating Lightspeed and Hyperspace FX
Part 2: Exterior Hyperspace Animations
by Jedi Knight Toren Depor
1) For this section of the tutorial I used the 3DS version of the Rebel Blockade Runner over Sci-Fi 3D. You can use whatever vehicle you want in whatever file format you want but you will need to adjust the instructions in this tutorial to fit your model.

Corellian Corvette 3DS Model
2) Once you have downloaded the Corellian Corvette and unzipped it, open up Animation:Master and create a new project (Project>New). Rick click (Command-Click on the Mac) on the Objects folder and the select Import>Prop... browse to wherever the Corvette 3DS model is and import it.
3) Right click (Command-Click on the Mac) on the Choreographies folder and select "New Choreography." Highlight the new choreography in the Project Workspace and title it "jumpext." Select the camera and go to the Translate tab on the Properties Panel and enter these values: X: 1.92cm, Y: 148.04cm, Z: -413.52cm. Switch to the Switch to the Rotate tab and enter in these values: X: 44.76, Y: -13.23, Z: 88.44, Roll: -0.00. Your choreography should like Figure 2-1 below.
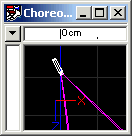
Figure 2-1
4) Now we are going to create a path for the ship to follow. Go into Add mode (A) and draw a spline path with four points similar to the images below. You will need to tweak the shape from the sides to get the path to look something like this:
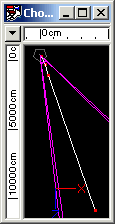
Figure 2-2 | 
Figure 2-3 |
The coordinates of the above four points, starting with the one nearest to the camera:
CP1: X: 136.81cm, Y: 0cm, Z: -231.2cm
CP2: X: 389.47cm, Y: 0cm, Z: 321.5cm
CP3: X: 626.35cm, Y: 0cm, Z: 1111.08cm
CP4: X: 4017.03cm, Y: 0cm, Z: 10908.7cm
5) Now we need to add our ship to the scene. In the Project Workspace, drag and drop the Corellian Corvette 3DS model onto the Choreography. On the Scale tab of the Properties Panel, go enter 500 into the X, Y, and Z fields. Expand the &quoot;Shortcut to the corvette" model until you see Channels for X-Scale, Y-Scale, and Z-Scale. Select each one of them one by one and on the General tab of the Properties Panel, set the Default Interpolation to Hold. Open each Channel up and add a CP (keyframe) at frame 45 (1:15) with a value of 1. Close these channels when you are done.
6) Right click (Command-Click on the Mac) on the "Shortcut to corvette" in the Project Workspace. Select New Constraint>Path. On the General tab of the Properties Panel, Select Path1 in the Object drop-down menu. Highlight the 0.00 value in the Ease control and hit Enter to create an Ease channel for this path constraint.
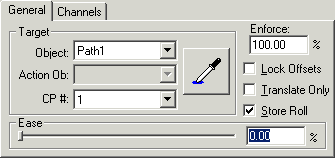
Figure 2-4
7) In the Project Workspace, expand the Constrain to Path "1" (Path1)" and select the Ease channel. On the Properties Panel, change the Default Interpolation to Linear. Now open the Ease channel. Click Add (A) to add CP's to the Ease channel. The first keyframe should be at frame 0 and have a value of 0. The second keyframe should be at frame 30 (1 sec.) and have a value of 4.50. The third keyframe should be at frame 45 (1:15) and have a value of 100.00. When you are done, your Ease channel should look like Figure 2-5 below.
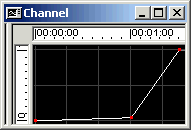
Figure 2-5
8) Next, we want to add some engine glows since 3DS props don't have glowing surfaces in A:M. Create a new model (File>New Model) and name it "glows" by highlighting the model in the Project Workspace and hitting F2. Draw a diagonal spline (A) like the one in Figure 2-6. The outermost CP should be about 2.8cm from the center of the model.
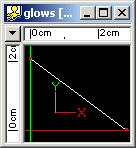
Figure 2-6
9) Set the number of lathe cross sections to 8 by going to the Modeling tab in the Tools>Options menu. Then select one of the CP's of the spline you just drew and lathe it (L). You should have a cone similar to the one in Figure 2-7. Now select the top of the cone and delete it. It should look like Figure 2-8.

Figure 2-7 | 
Figure 2-8 |
10) Now Select All (CTRL+A) and rotate the remaining ring 90 degrees along the X axis. This can be done either by hitting R and pulling the red handle around, or by entering the value into the X Rotate field (top field) on the Group tab of the Properties Panel.
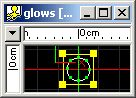
Figure 2-9
11) Now select the left half of the ring as shown in Figure 10 and hit delete. Select the spline that is connecting the top and bottom CP's together and hit K. Select a CP on the remaining half-ring and lathe it (L).
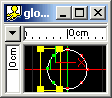
Figure 2-10 | 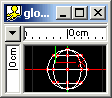
Figure 2-11 |
12) Switch to the top view (5 on the keypad) and select the front half of the sphere as shown in Figure 12 then hit delete. As in the previous step, you will need to break the remaining splines by selecting them and hitting K. You should end up with the half-sphere shape shown in Figure 13. NOTE: There will also be connecting splines running between the top and bottom of the half sphere.
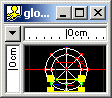
Figure 2-12 | 
Figure 2-13 |
13) Now you are going to need to move this half sphere into position. Select All (CTRL+A) and go to the Group tab of the Properties Panel. Enter -76.38cm into the Z offset field (bottom right field). Then enter 20.89cm into the Y offset field. While the sphere is still selected copy it (CTRL+C) and paste it (CTRL+V) and enter 14.14cm into the X offset field on the Group tab of the Properties Panel. Your model should look like Figure 2-14.

Figure 2-14
14) Paste (CTRL+V) again, and this time, enter these offset values into the appropriate fields: X: 6.79cm and Y: 10.22cm. Paste (CTRL+V) a third time and enter these offset values: X: 20.47cm and Y: 10.22cm. Your model should like Figure 2-15.
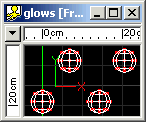
Figure 2-15
15) Now select the top two half spheres that you just created (Figure 2-16) and copy (CTRL+C) and paste (CTRL+V). On the Pivot tab of the Properties Panel, enter 20.89cm into the Y field and hit Enter. Right click (Command-click on the Mac) on the selected half spheres in the modeling window and select Flip>Y-Axis. Your model should now look like Figure 2-17.
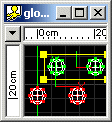
Figure 2-16 | 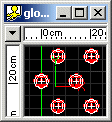
Figure 2-17 |
16) Select the original half sphere and hit the Period (.) key. Copy (CTRL+C) and paste (CTRL+V). Go to the Pivot tab on the Properties Panel and enter 0 into the X field. Right click (Command-click on the Mac) on the selected half spheres in the modeling window and select Flip>X-Axis. Your model should now look like Figure 2-18.
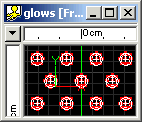
Figure 2-18
17) Select the "glows" model in the Project Workspace. Go to the Color tab on the Properties Panel. Click on the color swatch and go down to Other. In the color menu that appears, enter 255 into the Red and Green fields, and 202 into the Blue field, then hit okay. Set the Ambiance to 100 and the Falloff to 0. Go to the Reflectivity tab and check on Glowing. Close the model.
18) Right click (Command-click on the Mac) on the "glows" model and select New>Pose. Name this pose "boom." Switch to Muscle Mode (F7) and scale each of the half-spheres to 200% on the X and Y axis.
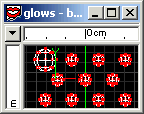
Figure 2-19 | 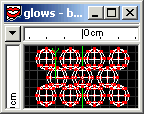
Figure 2-20 |
18) If it isn't already open, open the choreography that we were working on earlier. In the Project Workspace, drag and drop the "glows" model onto the choreography. Right click (Command-click on the Mac) on the model in the Project Workspace and select New Constraint>Translate To. On the General tab of the Properties Panel, select the Corellian Corvette 3DS prop as the target object. Right click (Command-click on the Mac) on the model in the Project Workspace and select New Constraint>Orient Like. On the General tab of the Properties Panel, select the Corellian Corvette 3DS prop as the target object. If you scrub through the animation, you will see that the "glows" model that we made matches perfectly to the 11 engines on the Corvette.
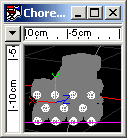
Figure 2-21
19) Expand the "Shortcut to the glows" model until you see a second "Shortcut to glows" icon. Select it and on the Channels tab of the Properties Panel check on the channels for X-Scale, Y-Scale, Z-Scale, and Ambiance. Select each one of the Scale channels one by one and on the General tab of the Properties Panel, set the Default Interpolation to Hold. Open each Scale Channel up and add keyframe at frame 0 with a value of 100 and another keyframe at frame 45 (1:15) with a value of 1. Select the "Shortcut to glows" model and make sure that the Pose Slider window is open (ALT+3) and hit enter in the percentage field for "boom" to create a Pose Channel. Expand the "Shortcut to glows" model until you see the percentage channel for the "boom" Pose slider. Select the channel in the Project Workspace and set the Default Interpolation type to Hold. Open the channel and add a CP at frame 33 (1:00) with a value of 100. Close these channels when you are done.
20) Select the Ambiance Channel on the General tab of the Properties Panel and set the Default Interpolation to Linear. Open up the Ambiance channel and create a keyframe at frame 0 with a value of 50, a second keyframe at frame 28 with a value of 50, a third keyframe at frame 30 (1 second) with a value of 100, and a fourth keyframe at frame 45 (1:15) with a value of 0. Your Ambiance Channel should look like Figure 20.
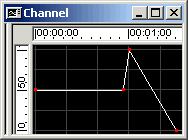
Figure 2-22
21) Open up your choreography, switch to the camera view (1 on the keypad) and render! NOTE: In my animations below, I have composited the animation over a starfield and improved the lighting of the scenes.
22) If you wanted to create an animation of a spaceship dropping out of hyperspace, you would repeat all of the above steps. The only differences would be that you start drawing the path from the point furthest from the camera (where the ship will emerge from) and the ship drops out during the first 15 frames and then slows to a normal speed. The project file includes a drop-out sequence.
Part 1: Observations and References of Lightspeed/Hyperspace Phenomenon
An analysis of the different effects associated with hyperspace, and the difference in their appearance throughout the films.
Part 3: Creating Lightspeed starlines
Creating a group of glowing splines and animating them stretching towards he camera.
Part 4: Creating Hyperspace Tunnels
Hyperspace Tunnel #1: Star Wars: Episode IV: A New Hope
Creating the hyperspace tunnel effect as seen just prior to the Millennium Falcon dropping out of Hyperspace in the Alderaan system in ANH.
Hyperspace Tunnel #2: Star Wars: Episode VI: Return of the Jedi
Creating the hyperspace tunnel effect as seen from the cockpit of the Millennium Falcon as it drops out of Hyperspace in the Endor system in ROTJ.
Hyperspace Tunnel #3: Star Wars: Episode II: Attack of the Clones
Creating the hyperspace tunnel effect as seen in Select #20.
DOWNLOADS
Completed Project File .99MB
Contains all of the materials, models, actions, and choreographies used in this tutorial in a ZIP Archive.
Completed Project File .99MB
Contains all of the materials, models, actions, and choreographies used in this tutorial in a SIT Archive.
Tutorial: Off-Line Version 6.76MB
All of these tutorials downloadable as a ZIP Archive.
Tutorial: Off-Line Version 6.81MB
All of these tutorials downloadable as a SIT Archive.
CREDITS:
Tutorial by Jedi Knight Toren Depor(a.k.a. Filmmaker Matt Pfingsten)
Special Thanks to
Zoo of Sci-Fi3D for donating the Corellian Corvette 3DS model
The Animaster Mailing List for providing such great feedback and support on all of my tutorials.
TheForce.Net for hosting this tutorial
Hash Inc. for making such powerful 3D software
George Lucas for creating Star Wars

![[TFN FanFilms Now On YouTube.com]](/fanfilms/images/fanfilm-youtube.jpg)