"An elegant weapon, for a more civilized age:" Creating Lightsabre FX
Part 3: Preparing the Lightsabre for Animation
by Jedi Knight Toren Depor
1) Go into Bones mode (F6). Create a new bone (A) it should be called "Bone1." On the Position tab of the Properties panel for Bone1, enter 1,0,0 into the Start Position fields and 1,0,-70 into the End Position fields. Unselect that bone (Enter). Create a new bone called "Bone2" and enter 0,0,0 into the Start Position fields and 0,0,-71 into the End Position fields. Unselect that bone (Enter). Create a new bone called "Bone3" and enter -1,0,0 into the Start Position Fields and -1,7,-70 into the End Position fields. Your skeleton should look like the one below.
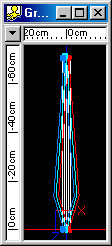
Figure 3-1
2) Click "Bone1" and assign all of the CP's on the right side of the model to it (G). Click "Bone2" and assign all of the CP's in the middle to "Bone2" (G). Assign all of the bones on the left side of the model to "Bone3" (G). Figure 3-2 is color coded to show you which Bone Each CP is assigned to. Bone1 is red, Bone2 is green, and Bone3 is blue.
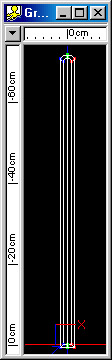
Figure 3-2
3) Create a New Pose by Right-Clicking (Command Click on the Mac) on the model in the Project Workspace and selecting New>Pose. Enter 100 into the frame field. Click on "Bone3" and enter -100 into the X Rotate field on the Rotate tab into the Properties Panel. Enter 0 into all other fields on the Rotate tab. Select "Bone2" and enter 70 into the X Rotate field and 70 into the Z Rotate Field. Enter 0 into all other fields on the Rotate tab. Select "Bone1" and enter 0 into all fields on the Rotate tab. Go into Muscle Mode (F7) and click on the top two center CP's and enter 100 into the Magnitude Field on the Group tab of the Properties Panel.
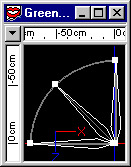
Figure 3-3
4) Go back to Skeletal Mode (F8). Enter -100 into the frame field. Click on "Bone1" and enter -100 into the Y Rotate field on the Rotate tab into the Properties Panel. Enter 0 into all other fields on the Rotate tab. Select "Bone2" and enter -70 into the X Rotate field and 70 into the Z Rotate Field. Enter 0 into all other fields on the Rotate tab. Select "Bone3" and enter 0 into all fields on the Rotate tab. Go into Muscle Mode (F7) and click on the top two center CP's and enter 100 into the Magnitude Field on the Group tab of the Properties Panel. Change the bone rotation channels Default Interpolation type from Spline to Linear. Name this pose "Swing."
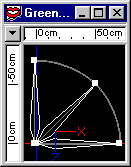
Figure 3-4
5) Open the sabre model and Select All (CTRL+A) and copy it (CTRL+C). Create a new model and paste it into the model. Delete the interior patches so you are left with an object like the one below.
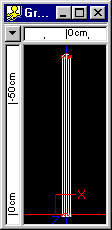
Figure 3-4 | 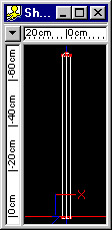
Figure 3-6 |
6) Go into Bones mode (F6) and create a new bone (A). On the Position tab of the Properties Panel, enter 0 into all of the Start Position fields and the first two End Position fields. Enter -71 into the last End Position field. Assign all CP's to that bone (G). Name this model "Shadow."
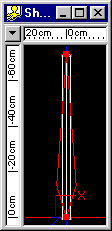
Figure 3-7
Part 1: Observation and References of Lightsabres
A list of observations about the nature of Lightsabre blades, as well as visual references.
Part 2: Modeling and Texturing the Lightsabre Blade
Creating a Lightsabre shaped plane that glows.
Part 4: Creating Lightsabre Collision and Blaster Deflection Lens Flares
Creating a lens flare using A:M's built-in lens flare tools.
Part 5: Animating the Lightsabre
Animation #1: Making the Lightsabre Pulse
Animating the ambiance of the glowing materials so that they pulse.
Animation #2: Making the Lightsabre Activate and Deactivate
Animating the ambiance and the scale of the blade.
Animation #3: Making the Lightsabre Swing
Making the sabre appear to stretch as it is swung.
Animation #4: Creating a Lightsabre Duel
Making two lightsabres produce a clashing effect when they collide.
DOWNLOADS
Completed Project File 70.4 KB
Contains all of the materials, models, actions, and choreographies used in this tutorial.
Tutorial: Off-Line Version 996KB
All of these tutorials downloadable as a ZIP Archive.
Tutorial: Off-Line Version 1.06MB
All of these tutorials downloadable as a SIT Archive.
CREDITS:
Tutorial by Jedi Knight Toren Depor (a.k.a. Filmmaker Matt Pfingsten)
Special Thanks to
Hal Hickel of ILM for verifying the existence of lightsabre shadows
Loring Veenstra for Beta testing my lightsabre tutorial
Jan Horjus for Beta testing my lightsabre tutorial
TheForce.Net for hosting this tutorial
Hash Inc. for making such powerful 3D software
George Lucas for creating Star Wars

![[TFN FanFilms Now On YouTube.com]](/fanfilms/images/fanfilm-youtube.jpg)