"An elegant weapon, for a more civilized age:" Creating Lightsabre FX
Part 2: Modeling and Texturing the Lightsabre Blade
by Jedi Knight Toren Depor
1) Create a new model (File>New>Model). Switch to the Top view and create a horizontal 3-point spline that is 2cm wide. Select All (CTRL+A) and make all splines peaked (P). Make sure the new spline is located at the axis marker as shown below. Select All (CTRL+A) then right click (Command Click on the Mac) and select "Snap to Grid."
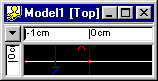
Figure 2-1
2) Extrude (E) the new spline back along the Z-axis to create a blade that is 70cm tall. NOTE: You can simply hit Extrude (E) and type in 70cm into the Z Offset field on the Group tab of the Properties Panel. Select All (CTRL+A) then right click (Command Click on the Mac) and select "Snap to Grid."
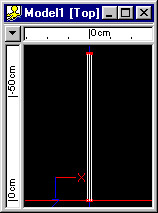
Figure 2-2
3) Grab the middle Control Point (CP) that is at the top of the blade and drag it back 1cm along the Z-axis to create a point for the blade. While the point CP is still selected, make that point rounded (O). On the Group tab in the Properties panel for that CP, enter 250 into the magnitude field.
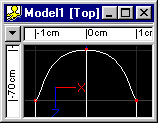
Figure 2-3
4) Select the bottom half of the left spline as shown in Figure 2-4. Hit the O key to make them rounded. Repeat this to the spline on the right.
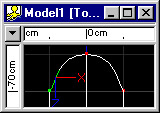
Figure 2-4 | 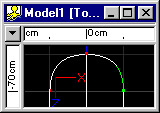
Figure 2-5 |
5) Hit SHIFT+Z to fill the screen with the model, then click the render button and render your model. You'll see that it doesn't look anything like a Lightsabre blade, yet.
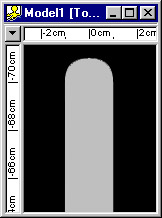
Figure 2-6
6) Select All (CTRL+A) and in the Project Workspace name the group "White." Create a new material and expand the tree to see the Attribute node. Click on the attribute node. On the Color tab of the Properties Panel change the color to White and set the Ambiance to 100. Click on the Reflectivity tab and check the boxes "Override Base Attribute" and "Glowing." Name this material "White" and drag onto the "White" group of your model. Render your model. It's starting to look more like a sabre. NOTE: Progressive Render will not render glows. The Modeling window must also be maximized for glows to render.
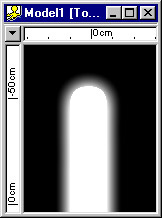
Figure 2-7
7) Now you need a colored outer glow. Select All (CTRL+A) and Extrude (E). While the new extrusion is still selected, go to the Group tab on the Properties panel and enter 175 into the X scale field (top scale field) and 102 into the Z scale field (bottom scale field).
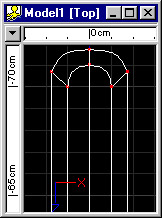
Figure 2-8
8) Drag the original top point CP, as shown in Figure 2-9, and drag it aside and refresh the screen (Space). You will notice that our little extrusion as created some double geometry, so select the middle spline and delete it. Drag the middle top point CP back into place and hit "Snap to Grid."
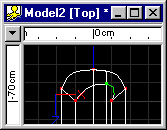
Figure 2-9 | 
Figure 2-10 |
|

Figure 2-11 |
9) Select each of the sides of the new extrusion and make them named groups. There should be four, each named "Glow1," "Glow2," "Glow3," and "Glow4." In Figure 12, the colored patches are there to help you identify the different groups, do not actually make the groups with different colors.
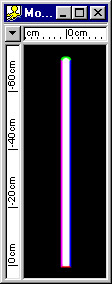
Figure 2-8
10) Create a new material and expand the tree to see the Attribute node. Click on the attribute node. On the Color tab, select a glow color, such as a light green, a light blue, or a light red. Enter 100 into the Ambiance field. On the Reflectivity tab, check the "Override Base Attribute" and "Glowing" checkboxes. Name this material "Glow." Drop the material onto the groups "Glow1," "Glow2," "Glow3," and "Glow4."
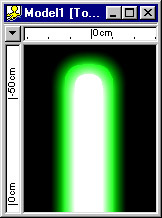
Figure 2-13
11) For this tutorial, I created a handle for my sabre my lathing a cylinder.
12) Select the sabre model in the Project Workspace and name it "Green Sabre," or whatever color you have made your sabre. Click on the Color Tab of the Properties Panel and enter 100 into the Ambiance field.
Part 1: Observation and References of Lightsabres
A list of observations about the nature of Lightsabre blades, as well as visual references.
Part 3: Preparing the Lightsabre for Animation
Adding a simple skeleton and creating two poses.
Part 4: Creating Lightsabre Collision and Blaster Deflection Lens Flares
Creating a lens flare using A:M's built-in lens flare tools.
Part 5: Animating the Lightsabre
Animation #1: Making the Lightsabre Pulse
Animating the ambiance of the glowing materials so that they pulse.
Animation #2: Making the Lightsabre Activate and Deactivate
Animating the ambiance and the scale of the blade.
Animation #3: Making the Lightsabre Swing
Making the sabre appear to stretch as it is swung.
Animation #4: Creating a Lightsabre Duel
Making two lightsabres produce a clashing effect when they collide.
DOWNLOADS
Completed Project File 70.4 KB
Contains all of the materials, models, actions, and choreographies used in this tutorial.
Tutorial: Off-Line Version 996KB
All of these tutorials downloadable as a ZIP Archive.
Tutorial: Off-Line Version 1.06MB
All of these tutorials downloadable as a SIT Archive.
CREDITS:
Tutorial by Jedi Knight Toren Depor (a.k.a. Filmmaker Matt Pfingsten)
Special Thanks to
Hal Hickel of ILM for verifying the existence of lightsabre shadows
Loring Veenstra for Beta testing my lightsabre tutorial
Jan Horjus for Beta testing my lightsabre tutorial
TheForce.Net for hosting this tutorial
Hash Inc. for making such powerful 3D software
George Lucas for creating Star Wars

![[TFN FanFilms Now On YouTube.com]](/fanfilms/images/fanfilm-youtube.jpg)