"An elegant weapon, for a more civilized age:" Creating Lightsabre FX
Animation #4: Creating a Lightsabre Duel
by Jedi Knight Toren Depor
1) Create two lightsabres using the techniques described in the Modeling and Texturing the Lightsabre Blade section. One should be an evil color, such as Red or Orange, and one should be a good guy color: such as Green, Blue, Purple, or Gold. Use the techniques described in the Preparing the Lightsabre for Animation section on both sabres as well.
2) Create a New Choreography by right clicking (Command Click on the Mac) on the Choreographies folder and selecting New Choreography. Click on the Choreography in the Project Workspace and type 60 into the Length field. Drag the Lightsabre models onto the choreography, then add an "Aim Roll At" constraint to each one by right clicking (Command Click on the Mac) and selecting New Constraint>Aim Roll At. Select the Camera as the target. This will make sure that the sabres always faces the camera. On the General tab of the Properties Panel uncheck "Cast Shadow" and "Receive Shadows" for both sabres. On the Rotate tab of the Properties panel of the sabre models, enter -100 into the Y rotate field and 0 into the X and Z fields.
3) Drag the "Shadow" model onto the choreography twice and apply "Orient Like," and "Translate To," constraints with the Lightsabre models as the targets. Enter Skeletal mode (F8) and apply a new "Scale Like" constraint to "Bone1" of the Shadow model with Bone2 of the Lightsabre models as the target. Do the same to both shadow models. On the General tab of the Properties Panel, uncheck "Active," "Cast Reflections," and "Receive Shadows." Then drag the "Pulse" action onto the sabre models. Enter 15 in the Repeat field. If you want a longer animation, then you need to figure out how many times you want the animation to loop. Simply divide the number of frames of the animation by the number of frames of the "Pulse" action, which happens to be 4 frames and enter the result into the Repeat field.
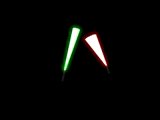
4) Enter 0 into the X, Y, and Z rotate fields on the Rotate tab of the Properties Panel for both lightsabre models on all of the following frames: 0, 9, and 10. Create some key frames between frame 10 and frame 53 (1:23) of the sabres swinging and clashing.
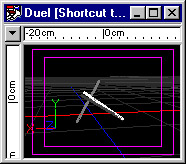
Figure 5-4-1
5) To make the sabres deform as they move, turn on Onion Skinning (Tools>Options>Onion Skin) and set it to 1 frame before and a step of 1 frame. Check "Onion Skin" checkbox. Onion Skinning allows you to see previous and forthcoming frames. NOTE: Onion Skinning is only available in A:M 8.0 or later.
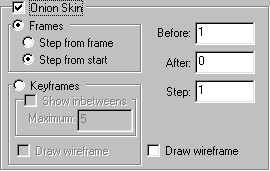
Figure 5-4-2
6) Select one of the lightsabre models and open the Pose Sliders window (ALT+3). As the animation plays, use the "Swing" pose slider to make the sabre stretch out as it moves. If the sabre is moving left, drag the slider between 0 and -100. If it swings right, drag it between 0 and 100. I usually make the back edge of the blade touch the front edge of the previous frame, as shown below. Repeat for the other sabre.
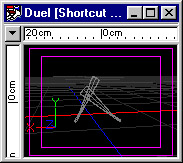
Figure 5-4-3
7) Click on one of the sabre models and open the Pose Sliders window (ALT+3). At frame 0 drag the "Deactivated" slider up to 100%. At frame 2, hit enter in the percentage field for the "Deactivated" pose slider. At frame 8 drag the "Deactivated" slider down to 0%. At frame 53 (1:23), enter 0 into the percentage field for the "Deactivated" pose slider. At frame 40 (1:10), drag the slider up to 100%. Repeat for the other sabre. Under the Pose Channels folder for the shortcut to lightsabre, change the Default Interpolation type from Spline to Linear for the "Deactivated" pose.
8) Drag the Attribute Node of the "White" material onto both of the lightsabre models in the choreography. On the Channels tab of the Properties Panel, check the "Transparency" checkbox. Do the same for the "Glow" material. Change the Default Interpolation of all channels from Spline to Hold.
9) Expand the attribute node for the "White" material in the action. Open the Transparency channel and create a CP at frame 0 with a value of 100, a CP at frame 2 with a value of 0, and a CP at frame 40 (1:10) with a value of 100. Repeat this for the Transparency channels of the "Glow" material.
10) Drop the "Clash Flare" into the sabre duel choreography that you made. Click on the "Shortcut to Clash Flare" in the Project Workspace and on the Flare Global of the Properties Panel, select the Intensity field and hit enter. A channel for the flare's intensity will appear. Expand the tree for the "Clash Flare" and click on the Intensity channel for Flare Global. Change the Default Interpolation to Linear.
11) Let's say that on frame 25, you have your two sabres clashing. To add the lens flare, first move the "Clash Flare" to the point where the two sabres collide. Open the Intensity channel for the Clash Flare and add a CP at frame 0 that has a Value of 0. Add another CP to frame 24 with a Value of 0. Add a CP to frame 25 with a Value of 100. Add a CP to frame 27 with a value of 0.
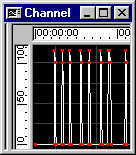
Figure 5-4-4
12) Render your animation. Your sabres activate, swings around and clash as they pulse, then deactivate.
Example:
duel.mov 316 KB
Animation #1: Making the Lightsabre Pulse
Animating the ambiance of the glowing materials so that they pulse.
Animation #2: Making the Lightsabre Activate and Deactivate
Animating the ambiance and the scale of the blade.
Animation #3: Making the Lightsabre Swing
Making the sabre appear to stretch as it is swung.
Part 1: Observation and References of Lightsabres
A list of observations about the nature of Lightsabre blades, as well as visual references.
Part 2: Modeling and Texturing the Lightsabre Blade
Creating a Lightsabre shaped plane that glows.
Part 3: Preparing the Lightsabre for Animation
Adding a simple skeleton and creating two poses.
Part 4: Creating Lightsabre Collision and Blaster Deflection Lens Flares
Creating a lens flare using A:M's built-in lens flare tools.
DOWNLOADS
Completed Project File 70.4 KB
Contains all of the materials, models, actions, and choreographies used in this tutorial.
Tutorial: Off-Line Version 996KB
All of these tutorials downloadable as a ZIP Archive.
Tutorial: Off-Line Version 1.06MB
All of these tutorials downloadable as a SIT Archive.
CREDITS:
Tutorial by Jedi Knight Toren Depor (a.k.a. Filmmaker Matt Pfingsten)
Special Thanks to
Hal Hickel of ILM for verifying the existence of lightsabre shadows
Loring Veenstra for Beta testing my lightsabre tutorial
Jan Horjus for Beta testing my lightsabre tutorial
TheForce.Net for hosting this tutorial
Hash Inc. for making such powerful 3D software
George Lucas for creating Star Wars

![[TFN FanFilms Now On YouTube.com]](/fanfilms/images/fanfilm-youtube.jpg)