By J. Daniel Sawyer
6. Recolor
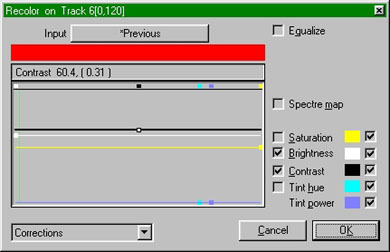
This effect will really bring out the lividity of the blade. Add a Recolor effect (Filtering -> Recolor) to track 6. We will be modifying the Contrast and Brightness keys to the following settings: Contrast (0.31) Brightness (0.21). Note: Only the numbers in parenthesis matter for this effect.
7. Paster Tool
To Track 7, add a Paster Tool (Compositing -> Paster Tool).
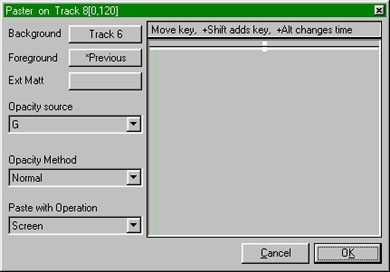
Your opacity source should be set to whatever color is closest to that of your blade (R, G, or B). The pasting operation is a matter of choice as much as anything else, but I have found, when working with sabers and lasers, that Screen and Lighten tend to work best under most lighting conditions.
8. Repeat and Animate
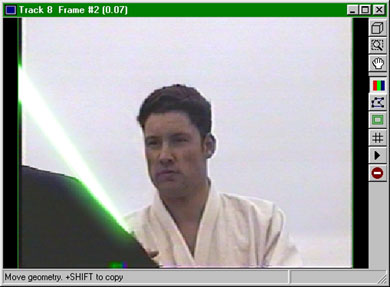
That's it for the blade setup. Here's what it looks like:
To set up the other blade, simply copy all the clips you just set up down to tracks 8-14, and then change the Geometry assignment on Track 8's Fill clip and change the color on Track 10's Aureole clip. You will also want to make an extra copy for tracks 15-21, to cover your suppplementary geometry. Once you have done that, it is time for the time-consuming part of the job. Step through the frames one at a time, and move the geometry so that it covers the blade one vertex at a time. The importance of ONE AT A TIME cannot be overstated. What you are doing here is keyframing. If you move the entire geometry or only reposition the vertices once in a while, MainVision will fill the intervening frames and you'll get "Dancing blades."
9. Supplementary Geometry
The supplementary geometry is there to deal with this inevetable eventuality:
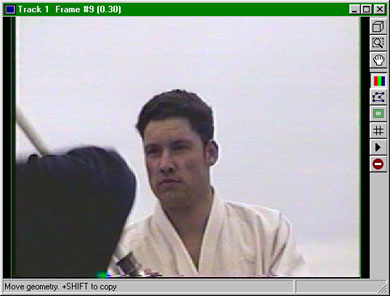
As you can see, the blade is effectively bisected by the arm that passes between it and the camera. When working with geometries this presents an obvious problem since we're effectively painting on top of the frame. There are only two possible solutions: Create a mask for the arm (very complicated for something moving so fast), or somehow fake it. That's where the supplementary geometry comes in. Using it, you can fake a mask for the arm, allowing your lightsaber to move behind something without fudging out a couple frames (little details like this make or break a professional looking effect). Here's what you do with it:
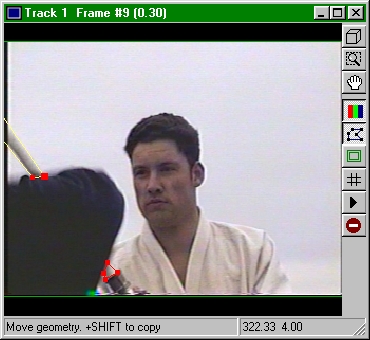
As needed, move it into the frame one vertex at a time to cover one of the exposed parts of the blade. When the obstruction moves and the blade can be seen all in one piece again, move the supplementary geometry out of the frame. Note: When you move the geometry into the frame MainVision will go back and try to fill in the previous frames. To fix this problem (i.e., to prevent the glowing geometry from crawling
across the screen), simply step back one frame and move the geometry, one vertex at a time, back into the black workspace outside of the frame.
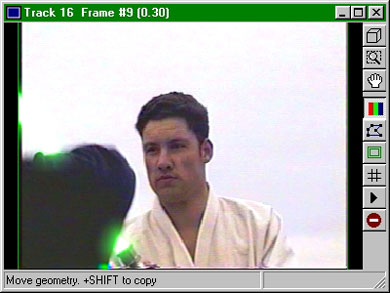
So, here's what the finished blade with the supplemental geometry in action looks like:
Now comes the actual work. Using the right arrow key, step through the frames one at a time, and move the geometries ONE VERTEX AT A TIME; doing this puts a new animation key in each frame. If you move the whole geometry at once, MainVision will try to "smooth" the movement and it will throw all of your previous frames off (if you mess up and move the whole geometry, just push CTRL-Z and it will undo what you just did). Check your work as you go. Make sure each frame flows well into the next by stepping forward and back.
Note: Sometimes after a Big move (like changing camera angles and the blades move halfway across the screen) MainVision will try to "Smooth" the last few frames. To fix this, simply step back one frame, correct that one, then keep moving forward. MainVision will automatically restore all the keys.
Note#2 It happens sometimes in a saber fight that one blade will be closer to the camera than another and then they will switch. In order to switch which effect appears at the front, simply insert another paster clip on the last track and paste the paster effect of the saber in front onto the paster effect of the saber in back, being sure to use the color of the foreground saber as the Opacity Source.
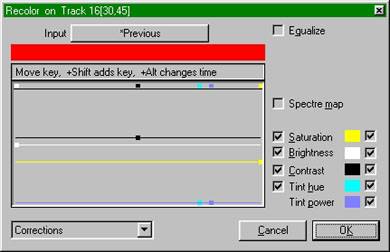
Final Note: If the results don't give you sabers as bright as you want, add another recolor effect with the same settings as the ones we used earlier. This will add a tough extra richness and depth to the sabers and enhance that really livid quality about them. Make this Recolor the final track in the project (after all your blades, compositing, and any contact flashes), so it can enhance everything that came before it. Here's another screenshot of my final track Recolor effect.
Continue to next page.

![[TFN FanFilms Now On YouTube.com]](/fanfilms/images/fanfilm-youtube.jpg)