Continued: Lightsaber and Energy Weapons
By J. Daniel Sawyer
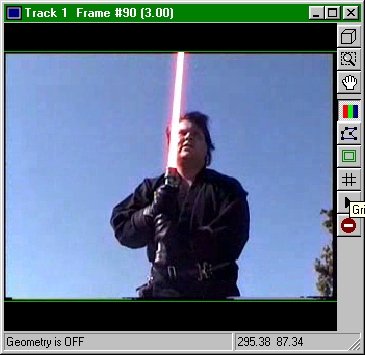
Addendum: As promised, here's a quick and dirty on the other, faster method. This produces sabers that look more like the TPM sabers (which I don't like quite as well), but they also wash out a bit easier against bright backgrounds. 1) Fill geometry (input set to previous) 2) Aureole effect set to maximum opacity (both internal and aura, input set to previous) 3)Paste Aureole on top of Fill with "Lighten" function. That's it. Here's a screenshot of what a finished product using this method looks like
II. Contact Flashes and Muzzle Flashes:
In the Star Wars movies, whenever two of the sabers touch there is an incredible release of energy in the form of a bright flash. Likewise, when firing a laser gun it looks
much better for there to be a muzzle flash. There are four ways to accomplish a bright intense flash like that:
1) Use blanks in your laser guns. This is not always practical, since many laser gun props are constructed from various scraps of metal, cardboard, and plastic to give them a really unique look. Add to that that blanks are not safe to use in close proximity situations. This also does nothing to help you with contact flashes or any other sort of flash.
2) Rotoscope them. Paint them in by hand, frame by frame, in Photoshop or some similar program. But who wants to take that kind of time to do a muzzle flash if there's an alternative?
3) Use a Lens Flare Photoshop Plugin as a MainVision effect. This method works very nicely, but I would only recommend buying a Lens Flare plugin if you are going to use it a lot, they can be quite expensive and can sometimes be difficult to get to work properly.
4) Use MainVision native effects. That's what I'm about to show you. This is a fairly simple process, requiring four effects.
The first is the Star Generator (Geometry Shading -> Stars)
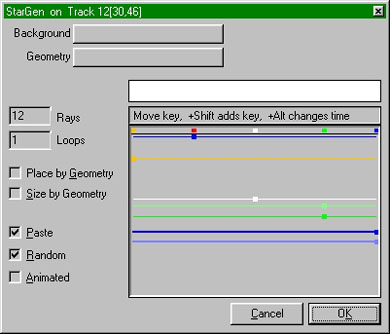
Do not assign any inputs for this. We will paste the complete effect onto the rest of our project when we are constructing it. Start out with a White star, and manipulate the keys until you have it where you need it, and at the proper size (These, like everything else, can always be fine-tuned later)
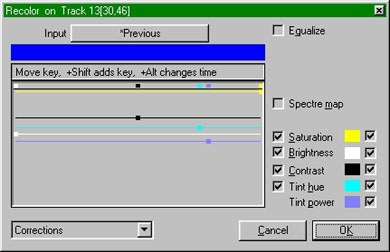
This is your next effect. Set the color to whatever color you want the flash to be (this will vary depending on how the shot is lit, what the purpose of the flash is, and what emotional effect you want to emphasize). I chose blue. After you have it colored to your
satisfaction, it's time to add a Gaussian Blur:

This will fudge out the artificial looking rays on the star and give you a nice soft halo. Now, all that's left is to paste:
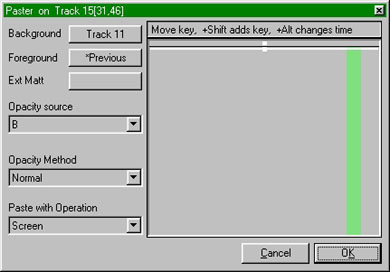
Make sure the Opacity source is the color that most closely resembles the one you've chosen (or the one that has the highest numeric value as a component of the color you've chosen. For example, if you were using pure yellow which has value of R255 G255 B0, you would want either R or G to be the Opacity Source). I eventually wound up using red for this scene, here's what the finished product looks like:

III. Energy Weapons
Now, on to the energy weapons. Lasers, Phasers, Ion Cannons, Concussion Rifles. It?s all the same process as making a saber blade. The only difference is in how you animate it.
Starting out in the frame you want the energy bolt to first appear in, here?s what you do. First, make your energy bolt (for our purposes it?s a laser bolt) geometry. Get it a good size and shape for the scene it?s in. Second, apply the effects described in section I
of this tutorial using whatever colors you deem proper (I like orange core and red glow myself). Third, skip ahead a few frames and move the geometry to the impact point. MainVision will automatically insert all the intermediary frames. If you?re shooting from foreground into the background, you will want to scale it down at the impact point, to create the illusion of the bolt travelling away from the camera. Again, MainVision will automatically insert intermediary frames, all you have to worry about is the start point
and the end point (of course, you'll also want to make sure that you only fill the bolt during the time you want it to exist on the screen).
A couple notes here: 1) When deciding how many frames to fill, keep in mind your frame rate and the distance the blaster bolt is travelling. Don't be afraid to do test renders and adjust the speed accordingly (by re-keyframing the geometry). 2) If you want a bolt to pass behind a tree or person or anything else, simply doctor the animation on a frame by frame basis so that the bolt never actually covers the thing you want it to pass behind. Making it just a tiny bit smaller than bolts passing in front of said object also helps make the illusion more convincing.
The results can be quite impressive. Here?s my very first energy weapons test: Click Here
Well, that about does it for Sabers and Energy Weapons. If you need any help, check out the MainVision User's forum The guys there are very friendly and always willing to help out. Also, you can drop me an email at lokmer@bigfoot.com or get ahold of me on the Blenderwars forum.
Happy Filmmaking!

![[TFN FanFilms Now On YouTube.com]](/fanfilms/images/fanfilm-youtube.jpg)