by Darel Finley
OK, here's how Henry And His New Toy was done. I've gotten some requests for a detailed explanation since I posted the URL on www.likeastory.com's amateur effects board, so I thought I'd throw together this page. Little did I know it would take about as long as it took to make the Henry clip in the first place! What the hell.
(Copyright Notice: The word "lightsaber" is probably owned by Lucasfilm Ltd., and "Star Wars" definitely is. This webpage is for informational purposes only, and I recommend using the authentic lightsaber effect only for non-commercial, experimental, amateur filmmaking.)
Ever since we saw the original Star Wars in 1977 (when it didn't say "Episode IV A New Hope"), enthusiasts such as myself have been wanting to have the ability to generate similar effects. Well it's been a long wait, but finally the equipment and the technique are within our grasp!
1. Making the Sabers
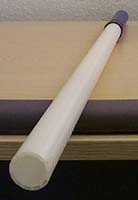
First, make one or more fake lightsabers. This consists of some kind of handle with a strong rod coming off of it for the beam. I used the plastic tube from the center of a roll of CalComp plotter paper. Then I wrapped blue and black electrical tape around one end to simulate the handle. (I left the blue end-cap on the taped end, to give it a little extra length.) The result kind of looks like a lightsaber already since the tube is white, but this is irrelevant since no one's going to be seeing the rod anyway.
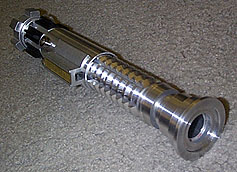
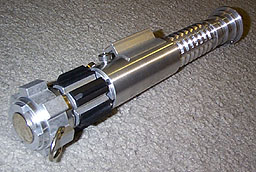
You can buy one from various sites. I found the best bargains (and very high-quality sabers) at ParkSabers. A 0.75 inch dowel can be securely installed in these sabers, by backing out a few screws from the central tube, inserting the dowel, and driving the screws back in through the dowel. The screws aren't wood screws, but they drive easily into a wooden dowel with just an allen wrench. Here are two views of the "Avenger" model from ParkSabers:
The rod should extend about 30 inches beyond the end of the handle, and should be somewhere between 0.5 and 0.75 inches in diameter. The plastic tube Henry is waving around is a lot thicker than that--1.3 inches--which creates problems because even with a white tube, there are times when it is darker than the local background, and it's hard to cover it all up. But with a thinner rod this shouldn't be a problem.
I recommend that you paint alternating bands of paint up the dowel, making it look something like a marquee selector. Plus a different color at the tip. This is so when the beam is moving fast and blurring badly, you can still see clearly what area it traverses. It also helps to ensure that no matter what color the local background (black, white, or whatever), you'll be able to see the rod. (Naturally, these goofy-looking bands won't be visible anywhere in your finished film.) I didn't go to the effort to do this banding for the Henry clip, so maybe you won't need to either. Here's my attempt at this banding. To simplify, I painted 3-inch-wide stripes, and used the wood color for the alternation. So I only had to paint 5 bands on each rod:
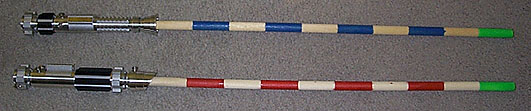
Use different coloration on each saber to make them easily differentiable in closeup shots where the fighters have crossed beams and are glaring/sneering at each other. Otherwise it will be difficult to tell whose beam is whose.
2. Film the actors.
Don't try to frame everything neatly in the shot. If the saber goes out of view partially, so what? It happened in the Star Wars movies all the time. Trying to get everything neatly in the shot just draws attention to the fact that it isn't real.
(WARNING: Mock fighting with mock lightsabers can be dangerous. Try it at your own risk.)
3. Capture To Filmstrip File
Next I used Adobe Premiere to capture the clip, and then rendered it as a "filmstrip" file. The clip was only 8 seconds long, but the filmstrip file was huge (around 74 megs). I chose 320x240, 30fps. Lower frame rates don't look so good for a lightsaber effect. If this was a full-blown lightsaber fight, I would have broken it up into little pieces of about 5 to 10 seconds each before saving each one as a filmstrip.
4. Rotoscoping
"Rotoscoping" is just a fancy term for doctoring something frame-by-frame. These instructions look complicated, but once you try it you'll find it's really pretty easy.
4a. Make a copy of the filmstrip file, name it "White Beams", and open it in Photoshop. I own Photoshop LE 4.0 which came with my Premiere. There are some serious limitations in Photoshop LE, but it will still work for this project. Make sure Photoshop is at 100% magnification (or more).
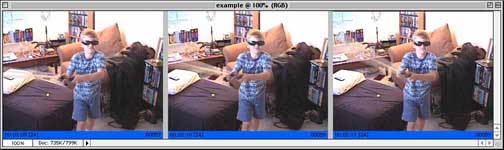
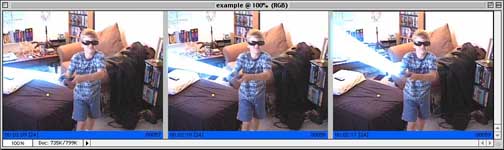
For the sake of this example, we will show only 3 frames, but in the real thing there would be a lot more. As you can see, this thick plastic tube is becoming rather obfuscated here, and 7-year-old Henry isn't even swinging it very fast. This is why the marquee-color-banding is worth doing.
4b. Darken the image somewhat: Select Image->Adjust->Levels and change the upper output level from 255 to 191. This will make it easier to see where you've drawn the beam.
4b. Important: Make a new layer by selecting New->Layer from the Layer menu. This layer will default to 100% opacity, draw mode, and visible, but you'll still be able to see through it because it has nothing in it yet. Do not forget to make this layer, otherwise you may do a lot of rotoscoping before you realize that you've been drawing in the filmstrip layer...ouch.
4c. (the actual rotoscoping) This is the only step you have to do for every frame in the filmstrip. (The aura stuff is done on all frames simultaneously.) Make sure the foreground color is pure white (255,255,255) and then draw a line over the rod in every frame using the line tool. Choose a line width that is slightly larger than the thickness of the rod when it is still. Use this same line width in every frame. If the beam is fanned (moving), then use multiple lines to cover it up solidly. Do not try to make it blur or fade when moving--that's just too much trouble and it won't look authentic if you do. It may be necessary to select the frame using the marquee selector tool before drawing, so as to ensure that you don't go outside the frame since the beam will often go out-of-frame. If only part of the beam is visible (such as when it's partially behind a person), then only paint white over the part that is visible (use the paintbrush when necessary). However, if the beam is behind the beam of another saber, draw over it anyway, even though the beam you're painting now is behind the other one. IMPORTANT: If there is more than one beam in the shot, do only one beam right now, then go back later (as mentioned in step 6) and do the other one. Do not do both at once! This is necessary to ensure that the beams can be different colors, but even if they are the same color you should still do just one to ensure that the auras are properly shaped.
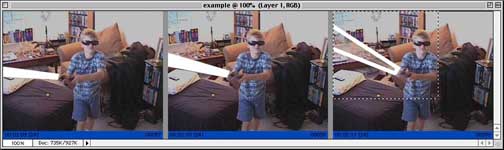
This picture illustrates 2 frames completed, and the third frame in progress. The marquee is being used to avoid drawing outside the frame. Three lines have been drawn to form the shape of the fanning beam, but the interior has yet to be filled in.
In frames where the beam is still, you may want to use the paintbrush tool to give the end of the beam a slightly rounded appearance, but be careful not to make it any wider than the beam itself.
Thanks to the layering of Photoshop, if you botch a frame up, you can just erase the white paint with the eraser and the filmstrip layer shows through.
5. Generating The Auras
Although a lightsaber beam is always white, it has a soft, colored, transparent aura around it which suggests the color of the beam.
5a. Select the "background" (filmstrip) layer from the layers window, then choose Levels and this time knock the top output level all the way down to zero. This will make the filmstrip turn black and just the white beams show. Not too impressive, eh? Well, we're not done yet.
5b. Select Layer->Flatten Image, and then save the file (already named "White Beams").
5c. Save the image again, but this time with the name "Colored Auras".
5d. Select Filter->Blur->Gaussian Blur, and do a blur with a radius about equal to your line width. Since my line width was 5, I will do a Gaussian blur of 5.0 pixels.
5e. Open the Levels window again, and this time reduce the upper input level to a really small number like 10. The auras will flare to a larger size.
5f. Do a Gaussian blur again, but this time twice as much. Since I blurred 5.0 in step 5d, I will now do a Gaussian blur of 10.0.
5g. Go back to the Levels window, and select "Red" from the Channel menu. Then change the upper output level to zero. Switch the Channel to "Green" and then change the upper output level to 127. The auras are now a nice, soft blue. If you wanted a red saber, you would leave the red channel alone, but knock out the green and blue channels completely. (In "Henry" I made the beam magenta, which is accomplished by knocking out just the Green channel.)
5h. Save the image (already named "Colored Auras").
5i. Open the "White Beams" file, Select All, Copy, close the file, then Paste into the auras image you just made. This will create a new layer. From the layers window, double-click this layer and set its mode to "Screen". The white beams and blue auras are now composited together.
(NOTE: Photoshop LE 4.0 which comes with Premiere does not allow you to set the mode of a layer! Argggh. But luckily, there is a way to get around it, using the "fake screen". It works like this: (a) Set the opacity slider of the top layer to 50%, (b) flatten the image, (c) in the Levels window change the upper input level to 127. Presto! About the same results as the real "Screen".)
(Optional: Before compositing these two layers, you may want to apply a small amount of blur to the top layer--the white beam layer--to soften up the edges of the white beam. This is an especially good idea for extreme closeups of actors faces which also include the beam nearby.)
5j. Flatten the image, if you haven't already from the previous step.
5k. Make sure the background color is set to black (0,0,0), and then use the marquee tool and "delete" key to destroy any aura fringes that might inappropriately invade adjacent frames.
5l. Save the image as "Beams Ready".
6. Compositing The Final Results
Now, simply composite the "Beams Ready" file onto the original filmstrip file, using the "Screen" method described in step 5i. Then flatten the image and save it with a new name. You can now open it in Premiere and use it in your movie.
(Optional: If your scene contains a lot of really bright areas (like bright sky), especially areas that might be pure white and would make a saber beam turn invisible, then before compositing any saber beams onto the original filmstrip, darken it slightly by reducing the upper output level from 255 to 223.)
Not quite as good-looking without the all-black background, but that's life. Your audience won't know the difference.
Multiple Sabers: If you have multiple sabers visible in this particular clip, then now is the time to go back to step 4 and do it all again for the other beam. But when you get to step 6, composite your new "Beams Ready" into the results of the first step-6 composite, not into the original untouched filmstrip. Note: When two saber beams cross, their white centers merge and there is no visual cue as to which one is in front. This is normal--view any of the Star Wars movies and you'll see that's how it's supposed to look.
Touch-ups: Before you use your final result filmstrip in Premiere, you'll probably want to use Photoshop to touch it up with a few flashy effects. For example, whenever two beams strike each other, there should be a very bright white/yellow flare at the point of contact. This flare should subside over the next 1 or 2 frames. I used a milder flare at the start of the "Henry" clip, to simulate the energy of activating his saber. (This was created with three radial foreground-to-transparent "screen" gradients; a large magenta one, a medium-sized light-magenta one, and a very small white one.) I also airbrushed away the white part of the tube in the very first frame, so it looks like he's just holding a handle with no beam extended from it yet. These little touch-ups might seem superfluous, but they are really vital for creating professional-looking results.
(Another good touch-up idea: When you show a close up of the actor holding his saber at the ready, with just the lowest part of the beam showing, add a little bright spot at the base of the beam, using radial gradients. It would look something like the third frame of "Henry".)
Making your saber extend/rectract: I haven't done this, but for any scene where the saber simply extends or retracts, I would just have no rod present, and draw it in as if there was one. Use some reference point in the picture to make sure you're aiming each piece in the same direction. Faster extension looks cooler and is easier to fake convincingly. If you want to have an actor extend his beam and immediately go into a fight without cutting to a different view, then consider airbrushing out the part of the rod that doesn't belong during the beam-extension frames.
Making your saber slice through things: I would use a short rod--say about 9 inches past the handle--and have the actor swing it just past the other actor. Then when you rotoscope it, simply draw the beam at it's full length, using the short rod as a guide.
7. Sound Effects
A silent lightsaber is just no fun. Get some sound samples and incorporate them into the Audio track. I found some of the original 1977 "Star Wars" sounds on this website. They worked fine.
Well, that's about it! Good luck, and I hope you get the same results I did.
Special thanks to George Lucas and the ILM wizards for dreaming it all up in the first place, and to Jim & Laura, for loaning me their enthusiastic young apprentice Jedi (Sith?).

![[TFN FanFilms Now On YouTube.com]](/fanfilms/images/fanfilm-youtube.jpg)