"Blast 'Em!!:" Creating Blaster FX
Part 3: Creating a Simple Firing Animation
by Jedi Knight Toren Depor
1) Before we can make the Blaster fire, it is helpful to create an environment to fire it in. Begin by creating a new model (File>New>Model) and name this model "Room." Create a new spline (A) along the 0 marker on the Y-Axis. It should stretch from the -1 Marker to the 1 Marker as in Figure 3-1. Select All (CTRL+A) and right click (Command-Click on the Mac) and select Snap to Grid.
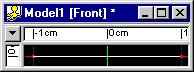
Figure 3-1
2) While the spline is still selected, and Extrude (E). Drag it up 2cm. Select All (CTRL+A) and right click (Command-Click on the Mac) and select Snap to Grid. Make all splines Peaked (P).
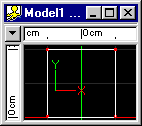
Figure 3-2
3) Switch to the Top View and Select All (CTRL+A). Extrude (E) and drag the new extrusion backward 2cm. Switch to the Bird's Eye View (Keypad 7) and you should have a cube as in Figure 3-3. Close the Model.
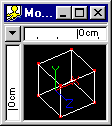
Figure 3-3
4) Next you need to have someone to fire the blaster and someone to get hit by it. For both characters I recommend downloading Cactus Bud Studios' Battle Droid Model. The file is 267KB.
5) Create a New Choreography (File>New>Choreography) named "Orange Blast." Drop the "Room" model into it. Go to the Scale tab on the Properties Panel and enter 10000 into the X and Y Scale fields (the top 2 fields) and enter 50000 into the Z scale field.
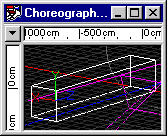
Figure 3-5
6) Now place the camera inside the room, at about the midway point. Also you will need to light this room so I recommend placing several instances of the default light in the room. I put the light intensity at 50% and placed instances of the light at each end of the room.
7) Now place a Battle Droid, or whatever character model you have chosen, at either end of the room. Make sure their guns are aiming at each other. Now draw a spline path (A) between the muzzle of one Droid's gun to the head of the other Droid.
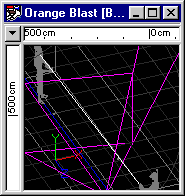
Figure 3-7
8) Now add the "Orange Blast" model to the choreography. right click (Command-click on the Mac) on the "Orange Blast" model in the Project Workspace and go to New Constraint and select Path. On the General tab of the Properties Panel select "Path 1" as the Object.
9) Set the current frame to 0 (it is 0 by default). Select the "Orange Blast" in the Choreography in the Project Workspace and hit the * key. Now select Constrain to Path "1" (Path1). On the Properties Panel enter 0 into the Ease field. Expand the Constrain to Path "1" (Path1) in the Project Workspace.
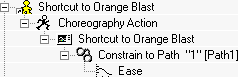
Figure 3-9
10) Select "e;Ease" in the Project Workspace and on the Properties Panel change the Default Interpolation from Spline to Linear. Now select Constrain to Path "1" (Path1) in the Project Workspace. Enter 2 into the frame field to go to frame 2 of the animation. Enter 0 into the Ease field. Go to Frame 16 and enter 100 into the Ease field on the Properties Panel. If you open the Ease channel by double-clicking it in the Project Workspace it should look like Figure 3-10.
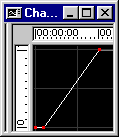
Figure 3-10
11) Go back to frame 0 and select "Shortcut to Orange Blast" in the Project Workspace. Uncheck "Active" on the General tab of the Properties Panel. Jump to frame 2 and check Active back on. Check it off again at frame 16. If you open the Active channel it should like Figure 3-11.
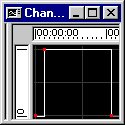
Figure 3-11
Example:

fire1.mov 19.0 KB
Part 1: Observations and References of Blaster Bolts
An analysis of the different types of laser fire, including stun blasts, and various related effects.
Part 2: Creating a Blaster Bolt
Creating a long and narrow cylinder with tapered ends and a glowing texture.
Part 4: Adding a Muzzle Flash
Modeling and animating a simple muzzle flash effect.
Part 5: Adding an Impact Explosion
Creating the nice little explosion that occurs when a blaster bolt hits a metal object like a battle droid.
Part 6: Adding an Impact Flare
Making the flare that appears when a blaster bolt strikes a person.
DOWNLOADS
Completed Project File 1.58 MB
Contains all of the materials, models, actions, and choreographies used in this tutorial.
Tutorial: Off-Line Version 217KB
All of these tutorials downloadable as a ZIP Archive.
Tutorial: Off-Line Version 222KB
All of these tutorials downloadable as a SIT Archive.
CREDITS:
Tutorial by Jedi Knight Toren Depor (a.k.a. Filmmaker Matt Pfingsten)
Special Thanks to
The Animaster Mailing List for providing such great feedback and support on all of my tutorials.
TheForce.Net for hosting this tutorial
Cactusbud Studios for their Battle Droid Model
Hash Inc. for making such powerful 3D software
George Lucas for creating Star Wars

![[TFN FanFilms Now On YouTube.com]](/fanfilms/images/fanfilm-youtube.jpg)